Thursday, December 12, 2013

Raw Living Sauerkraut with Caraway and Dill


Fermented foods scare me. I'm totally happy to eat them when prepared by other people, but I'm terrified of making them myself. What if I get it wrong? What if they go off? What if we all get botulism and end up in hospital and, you know, die?

Sure they're traditional, and 'everyone' used to make them – but my mother didn't, and nor did either of my grandmothers. In fact, I don't know anyone who has ever fermented foods, outside the usual group house refrigerator disasters. So I have no knack, no sense of how to do it, and no confidence.

But I eat mountains of living foods, particularly sauerkraut, and they're not cheap: my favourite sauerkraut costs $13.95 a jar. Worse, it comes from Byron Bay in a refrigerated truck – hardly local, sustainable eating for this Melburnian.

So the combination of my cheapness and my desire to eat locally led me to look up recipes for sauerkraut. I concluded that it isn't actually difficult – no expertise required - so I gave it a go. It took ten minutes, then five days of resting. At the end of that time, I had a slightly funky kitchen and a big jar of perfectly fermented local sauerkraut, made by me! What's not to like?

Sauerkraut is delicious with grilled chicken, sausages, or tossed through a quinoa salad. It's also fantastically healthy, but talking about nutrition bores me. If you want to learn about how eating sauerkraut tends your sacred inner garden (sigh), click here!

Sauerkraut with Caraway and Dill

- 1 green cabbage
- a bunch of dill
- 1 tsp caraway seeds
- sea salt (scant 3 tsp per kilo of cabbage)
- brine made from boiling 1 tbs salt with 1 cup water and leaving to cool

Slice the cabbage as thinly as possible. It's easiest to shove it through the shredding attachment of a food processor; otherwise, use a big sharp knife. Chop the dill. Combine the cabbage with the dill and caraway seeds.

Gently rub the salt into the mixture. Discover any open cuts, and suck your finger. Liquid will begin to seep out of the cabbage.

Firmly pack everything into a large glass or ceramic jar. Place a weight on the cabbage to hold it down. You can use a small plate with a clean stone on it, a smaller glass jar full of water, rolled cabbage leaves etc. Top up with brine, until the cabbage and the weight are submerged.

Leave in a cool place for five to seven days – check it every day and watch it change. It's fascinating! If any mould appears, skim it off with a spoon.

When the cabbage looks and smells right – kind of sour, but not gross – refrigerate. The longer you leave it, the softer its texture and the stronger and sourer its flavour. I prefer mine slightly crunchy and not too sour, which takes about five days of fermentation. It will keep for at least six weeks in the fridge.

To use: I am reluctant to use less than the standard ratio of salt to cabbage as the salt is the preservative; however, I find it a bit salty to eat straight from the jar. Therefore, before serving the sauerkraut I place it in a colander and give it a rinse, then leave it to drain while I prepare the rest of dinner.

(Local: cabbage. Garden: dill. Imported organic: caraway seeds. Northern Victoria: salt.)

Friday, August 9, 2013

Apple Butter


Deep in me is a little piece of Virginia. I lived there back in the dark ages, that is, when I was a teenager, but there's still a part of me that misses those heavily-forested mountains blazing with autumn colour; the red brick houses tucked among oaks and azaleas; the occasional glimpses of deer and bear. And I miss the roadside apple stands.

Ah, apple stands. If you're thinking of a charming tumbledown Tasmanian shed with a few bags of apples and an honesty box, think again. This is America, home of free enterprise and mind-blowing kitsch. Imagine instead a road, wending its way above the clouds through glorious mountains. Turn a corner, and be confronted by an enormous parking lot ablaze with the red, white and blue, if not the Confederate flag. There's probably music blasting, country or western – we like all types. The lot contains Ford Broncos and big Toyota trucks; the people wear jeans and flannelette shirts. You might see lank hair protruding from a battered baseball cap, or frizzy-haired women in tight jeans and full make up.

And there you buy God's gift to Virginia: apples. You can also buy cider, hard (alcoholic) or soft; apple butter; apple jelly; and maybe even salt-water taffy. You might also find cinnamon-scented candles, battery-operated plastic things, soft toys, t-shirts, flags, and a range of other tat.

The gallon jugs of cider are awesome, like nothing I've found in Australia. The apple jelly, a clear preserve, is sweetly quivering; and the apple butter smooth and unctuous.

At this time of year, in a Melbourne winter, the cool crisp air reminds me of a Virginian autumn. I go for brisk rides around town, looking for red bricks and deciduous trees, then come home and make apple butter.

I haven't seen apple butter for sale here. I don't know why, because it's simple to make, and delicious. It doesn't contain butter. Instead, it's just apples cooked down with sugar and spices until they form a glossy spreadable purée, just the thing to liven up a slice of toast or, better, pancakes. Apple butter pairs especially well with God's other gift to Virginia, the hog. Thanks to its climate, which makes it ideal for raising and curing hogs, Virginia is the capital of salty pork products.

Apple butter and bacon: cool hot, sweet salty, smooth crisp… the combination proves that there is a God, and she wants us to be happy. On a Sunday, my nine-year-old makes buckwheat pancakes while I frazzle up some bacon. We spread our pancakes thickly with apple butter, and load bacon on the side. Here's happiness on a plate, and something I owe to Virginia.

Two methods for apple butter are given below. If you have a food mill, you don't need to peel or core the apples, which makes for maximum flavour and pectin. If you don't have a food mill, peel and core the apples, expect to cook the butter longer, and use either a blender or an immersion blender to make a smooth purée.

Apple Butter

- 2 kg apples, any type, any combination (whatever's going off in the fruit bowl/whatever's cheap)
- 2 cups sugar
- the juice of a lemon
- 1 ½ tsp ground cinnamon
- ½ tsp ground cloves
- a pinch of salt

If you have a food mill, fantastic. Chop the apples randomly – don't peel or core them – and throw them into a big bowl. As you go, layer the apples with the sugar. Cover the bowl and leave all day or overnight to macerate.

If you don't have a food mill, peel and core the apples, then chop, layer, cover and leave as above.

Scrape the apples, leached juice and sugar into a large deep pot. Throw in the other ingredients. Cook over medium heat until the apples are completely soft, at least thirty minutes. Turn off the heat and leave to cool for a little while, then purée either by putting it all through the finest screen of a food mill, or using a blender of some sort.

Return the purée to the pot, and turn the heat back on. With the heat medium-low, keep stirring and scraping the purée, ensuring nothing sticks to the pan. If you stop stirring, it will spit like crazy – think quince paste. You have been warned. You will need to stir it for about an hour, or a bit more if you have excluded the peels and cores; it depends on the pectin levels of your apples.

Meanwhile – and this is the trick – wash five 300g jam jars. Sterilise the jars and lids using your chosen method (baby bottle steam steriliser / boiling water in deep pot), remove, and place on a tray in a low oven. Somehow, you will do all this about halfway through stirring the apple butter – either resign yourself to some butter spitting onto the wall while you flit between sink and stove, or enlist help! I recommend the latter.

After about an hour, the butter will begin to firm up. When a wooden spoon scraped across the bottom of the pot leaves a bit of a path, the butter will have attained a nice spreadable consistency (see picture below). Turn off the heat.

 
WEARING GLOVES, remove the jars from the oven and place on a wooden surface. If you don't have a wooden bench top, use a wooden board or even a stack of newspapers on the bench. Fill the jars, screw on the lids, and invert. Leave on the bench, undisturbed, for twenty-four hours. After this time, turn the jars right-side-up, label clearly with the contents and date, and store in a cool dark cupboard.

Important comment: Every government agency insists that the only safe way to preserve food is to run it through a boiling water preserver. They are right. You can find complete instructions here. The fact that I choose to use a traditional French method to seal jars is a matter of preference; if you try it and get botulism, don't blame me!

(Local: apples, lemon. Northern Victoria: salt. Not local: sugar, cinnamon, cloves.)

Friday, July 26, 2013

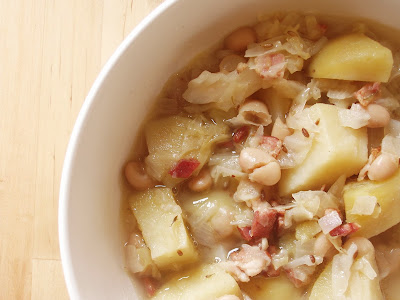
Cabbage, Potato, White Bean and Caraway Soup


Does every postgraduate student have a fantasy other life in which they imagine the path not taken? While writing her PhD, my sister pondered opening a shop of gifts for men, called The Thinking Man's Crumpet. She'd sell astrolabes and pipes and vintage magnifying glasses; detective novels and squashy cushions in muted, masculine colours; cufflinks, ties and very nice socks; select old records and CDs; and other things for the sort of intelligent and gentle man she finds attractive.

My fantasy is to open a soup shop. I imagine a tiny hole in the wall that seats six to ten people, with another half dozen seats outside. Every day, I'd make two or three soups, and that's it. Maybe you could get a bread roll or an apple, too – but nothing more complicated. In winter, I'd go heavy on the lentils and roast vegetables; in summer, light minestrones and gazpacho would feature strongly. People could come in and eat a bowlful, or buy a container for their supper.

I'd also sell stocks: good homemade veal and chicken and vegetable stocks for people to take home. I've yet to find a commercial stock that doesn't taste horrible; I think there's a market for proper stocks for the home cook.

I only drink wine and water with my meals, so see no reason to serve anything else. In my fantasy, you'd be able to buy a bistro glass of jug wine (red or white) to have with your soup; or perhaps some mineral water. Many years ago we lunched on bread rolls and glasses of vin ordinaire from a hole in the wall in Florence. The premises consisted of a counter facing the street, behind which three men filled the warm rolls and poured out wine. There was no seating, so everyone stood in the street munching and sipping. I wonder whether Australian licensing laws have caught up.

Because I've always wanted a small bookshop, I might also stock a few random books: favourite cookbooks, children's story books, and cosy detective novels – all good to read over soup. Or perhaps I'd just have them there for customers to thumb through; I haven't quite decided. While having books to read would make it the sort of place I'd want to go, it would also make people linger, and with such a small shop that might be a problem.

As for décor, perhaps I'd paint the interior the colour of rich pumpkin soup. And I'd want a few herb boxes on the footpath, overflowing with parsley and marjoram and thyme; the mingled scents would make everything eaten there taste better. I could put up a few soupy quotes around the place, preferably cross-stitched – I'm not afraid of kitsch – and the crockery would really need to be that heavy brown English stoneware from the 1970's.

Such a shop would almost certainly run at a loss, but since my husband owns a business, we could set my losses against his profits and pay less tax.

You see? So many things to think about – and so much easier than writing a literature review!

What follows is a winter soup, good to eat on a cold night. A slice of heavy rye bread, thickly buttered, would go nicely on the side.

Cabbage, Potato, White Bean and Caraway Soup

- 125g bacon rashers, chopped into little squares
- a big knob of unsalted butter
- 1 large onion, chopped
- 1 tsp caraway seeds
- ½ tsp dried thyme or a few sprigs of fresh thyme
- 500g white cabbage, shredded
- 750g yellow potatoes, chopped into bite-sized pieces
- 1 can cannellini beans, drained and rinsed
- 5 cups chicken stock or water
- sea salt

Warm the butter in a large soup pot. Cook the bacon until it is crisp. Remove the bacon with a slotted spoon and reserve.

Throw the onion into the pot, and cook until soft. Add the caraway seeds and thyme and cook for a few minutes. Add the cabbage and cook until it has wilted. Add the potatoes, cannellini beans, bacon and enough stock or water to just cover the other ingredients.

Bring to a simmer. Cover slightly, and cook for 45 minutes to an hour, or until the potatoes are tender. Check for seasoning. Serve.

Note: For a vegetarian version, omit the bacon, use vegetable stock (preferable one made with dried mushrooms) and add a second can of cannellini beans.

Adapted from a recipe found in the very useful Ultimate Cook Book.

(Local: potatoes, cabbage, bacon, thyme, onion. Not local: butter, caraway seeds, cannellini beans.)


The Ultimate Cook Book: 900 New Recipes, Thousands of Ideas

Tuesday, June 11, 2013

Gluten Free Peanut Butter Cookies

One thing leads to another – and most things lead to food. I have just read The Women in Black, a perfectly observed gem set in 1950’s Sydney. Young Lisa is a bright girl from a working class family. We meet her here poised between high school and the possibility of the great unknown, university. While she waits for her matriculation results, she takes a summer job in a department store. Through her work there, we glimpse the lives of the women in the department, from the drab Miss Jacobs to the moody and imperious Slovenian refugee, Magda, who decides to take Lisa under her wing.

Magda introduces Lisa to a lively Eastern European intellectual community, which she takes to like a duck to water, and the story of her coming-of-age, or at least a coming-just-a-little-bit-older, unfolds. One is left feeling grateful for the kindness of strangers who take an active interest in a young girl as she takes her first steps into womanhood. The story is gently comic and beautifully observed, from how different married couples converse to why people are attracted to each other to how the wealthy shop. A novel of quiet exchanges and small things, the parts hang together perfectly like an exquisitely-tailored dress.

Reading this poised, kind, insightful novel, I found myself remembering a poised, kind, insightful recipe book, Mrs Harvey's Sister in Law: And Other Tasty Dishes. I believe the author, Margaret Dunn, first wrote it for her daughters, but it was later published so that others could benefit from her stories, good humour and straightforward recipes. It’s the book your own grandmother never wrote. One of the recipes is for peanut cookies which, Mrs Dunn tells us, she ate while working in a department store during the war; they were brought to work by the lovely Winsome, who sat on a stool in the art department sucking a paintbrush.

Remembering these details (yes, my brain is stuffed full of the most useless facts), I got to thinking about peanut butter cookies, which I love… and so you can see how a quiet evening devouring a novel leads to a quiet morning baking with my four-year-old and a quiet afternoon devouring cookies. It’s true: reading can change your life, or at least your waistline.

I hope it’s not just me who cooks as a response to reading fiction; most novels lead me to the kitchen. Anything set in China (most recently, Brian Castro’s dream-like Birds of Passage; more often, a Judge Dee mystery) and I’m hungering for silken tofu or a perfect bowl of white rice. A lazy 1920’s romp, and I’m shaking a cocktail. Something set in Latin America and I’m making rice and beans for the next three weeks. The links aren’t always obvious: Magda introduces Lisa to salami with great success; and although I love salami, I wasn’t haring off to buy smoked sausage. Instead, because I already associated mid-century department stores with peanut cookies, I got busy with my grandmother’s mix-master.

Yet I like my cookies to have more texture than Winsome’s biscuits, so although she provided the department store – peanut cookie association, I used a favourite recipe from Canteen. Of course I made a few changes; what follows is my version, tweaked in several ways including but not limited to using quinoa flakes in place of oats, and a homemade gluten free flour mix.

To make gluten free flour, I follow gluten free girl’s formula, using 60% starch and 40% whole grains. For an excellent discussion of the merits of different flours in different uses, check out her page. It is enough here to say that I make up a batch of flour every couple of weeks, varying the grains and starches each time so that we eat a wider variety of foods than we would if we used proprietary blends. This week, our flour is 20% red sorghum, 20% amaranth, 30% corn starch and 30% tapioca starch and it’s been great. For these cookies, make up your own mix, use a proprietary gluten free flour, or even, shock horror, use regular wholemeal flour made from wheat which would, of course, render the cookies gluten free no more. Just to state the obvious.

(Below: Everybody needs a helper in the kitchen.)

Gluten Free Peanut Butter Cookies

- 75g soft unsalted butter
- 100g coconut sugar
- 100g caster sugar
- 1 egg
- 1 tsp real vanilla essence
- 120g crunchy peanut butter (I use a roasted sugar free salt free style.)
- 75g quinoa flakes
- 80g roasted peanuts (if you use salted peanuts, you won't need to add salt)
- 60g gluten free plain flour
- 1 tsp bicarb soda
- sea salt

Preheat the oven to 165°C. Line three cookie sheets with baking paper or silicon baking sheets. Chop the peanuts.

Cream the butter and sugars. Add the egg and vanilla and mix well. Fold in everything else. The dough will be fairly stiff. (At this point, you can refrigerate the dough for half an hour – but I can never wait. I suspect this is why my cookies are always slightly flat.)

Gently form the dough into medium-sized balls, about the size of walnuts. Flatten very slightly with the back of a fork. Bake for 8 minutes, or until the edges are turning golden.

Remove from the oven. Leave to cool on the trays for another quarter hour, then transfer to wire racks to cool completely.

Store in an air-tight container. I’m not sure how long they last; I can’t ever leave them long enough to find out! Makes about two dozen cookies.

(Sorry folks, this ain't local. At least most of the books mentioned are home-grown!)


The Women in Black Miss Phryne Fisher Investigates (A Phryne Fisher Mystery) Canteen: Great British Food

Tuesday, May 28, 2013

Chilli and Parsley Condiment


One of the things I have found gastronomically annoying about having children – and there's been more than a few – has been the absence of chillies in our diet. I was never a huge chilli eater, and during pregnancy and breastfeeding I couldn't stomach them at all. But when I was ready to introduce a little heat back into my diet, I realised my kids couldn't tolerate the things. Damn.

Other friends facing the same dilemma came up with different solutions. Mark chops a chilli and puts it on a saucer at the dining table, then sprinkles it on his dinner, but that's too raw for me. Naomi often prepares two or even three variations on a meal (one spicy); but I'm way too lazy. Marty gets a lot of takeaway, but our household has so many food intolerances and fussinesses that takeaway usually feels too hard for us. I resigned myself to the idea that I wasn't going to be eating many chillies for a long, long time.

Then earlier this year I spotted a most excellent chilli and garlic condiment. I had tried variations on this theme, and none were quite what I was looking for, but this was fantastic! I blobbed it on my lunchtime scrambled eggs while my four year old had hers plain; I dumped it in my leftover minestrone; I stirred it through pasta sauce to give it a lift; I scraped a little on quesadillas to cut through the cheese.

Within days I had finished the jar; and I faced a dilemma. While I was willing to buy it once and give it a go, this sauce came from Calabria. I didn't really want to keep purchasing an expensive product which had travelled over land and sea; the cost! the air miles! But then I was given a bag of home grown chillies. I got to wondering just how hard it was to make a chilli and garlic condiment; with a bag of free chillies, I had no excuse not to give it a go. So I whizzed up the chillies with garlic and covered them with olive oil; I did another batch with parsley and garlic, and it's great stuff. The condiment takes no time to make, keeps in the fridge for weeks, has a zillion uses, and if it's made with chillies from the garden and a local olive oil, requires no air miles at all.

While it feels a little late to be writing about chillies from the garden – it's almost winter – I notice three neighbours have ripe chillies in their front yards this week. I take this as a sign that they are still in season, and so with no further ado, I offer you… chilli condiment.

Chilli and Parsley Condiment

- 6 fresh long red chillies
- 6 big stems of lovely flat leaf parsley
- 2 cloves garlic
- sea salt
- olive oil

How you make this depends on your tolerance for heat. For everyday food, I prefer things warm, not blazingly hot. Therefore, I top the chillies, slit them open, and scrape out the seeds and membranes. If you prefer numb lips and the back of your head blown off, leave the seeds and membranes intact.

Throw the chillies, parsley, garlic and a hefty pinch of salt into a food processor and pulse-chop until you have a rough sauce. The parsley should still be in tiny squares; the chillies in teeny-tiny dice; and it should all be studded with little lumps of garlic.

Scrape it into a very clean glass jar, and cover with olive oil. Gently ease out any air bubbles with a flexible knife or a small spatula; add more olive oil if necessary to cover the surface.

Screw on the lid, pop it in the fridge, and you're ready to jazz up absolutely anything. Well, maybe not breakfast cereal.

Version two: Omit the parsley, and up the garlic to 6 cloves. It has more heat, and is also very good!

(Backyard: chillies, parsley. Local: garlic, olive oil. Northern Victoria: salt.)

Monday, May 13, 2013

Lebanese Style Chopped Salad with Sumac (and how to turn it into Fattoush)


Who wouldn't love living here? We've been at our new house just a few months, and already the neighbours are handing food over the fence. On a recent Saturday afternoon I was knee-deep in dirt, happily digging out couch grass. I still had bed hair. And then my reverie was interrupted by a deep 'yo!'. I looked up and saw a great hand waggling a loaf of pita at me; the pita was wrapped around a dozen kefta skewers. 'My mum said your kids like these,' said the unidentifiable eyes barely skimming the fence.

When one's neighbours have eight adult sons, all married with children, and most who come to eat at mum's at least one night a week, one tends to lose track of who has come to visit and whose eyes might be attached to the kefta-holding-hand. But the eyes grinned at me; so I smoothed down my bed hair to no effect, grinned back, and whisked the kefta out of his hands while they were still hot. They were fragrant with cinnamon and parsley, flecked with tomato, warm and juicy, and delicious. Lucky kids. They wolfed them down in seconds.

My fussy daughter – there's always one – has now added Fatima's kefta to the list of meats she will eat. This list consists, in its entirety, of plain sausages 'if they're the ones I like' (the organic GF ones from our local butcher meet her standard, thank god, but nothing too greasy or too thick or too thin or too spicy or too dry); bacon 'if it's not too crispy and not too soft, just a little bit please, and only from that farm' (yes, she can taste if the bacon is from a particular farm which will make her useful in the food industry in fifteen years' time, but makes it expensive to keep her now); sausage rolls 'but only Viv's' (Viv lives 70 miles away, somewhat inconvenient); and Fatima's kefta.

Given she also loathes eggs and fish and is not convinced about chicken (she only likes the skin, and only when roasted), and we have soy and shellfish allergies in the house (good grief!) I have latched onto kefta as a refreshing change from expensive sausages, very expensive bacon, chickpeas, and lentils. But my neighbours offers them only sporadically, and I don't know them well enough to beg for more, so I've been trying to make my own.

So far, I'm told, the results have been 'too bland, not like Fatima's'. I pointed out to my seven year old that Fatima has probably been making kefta once a week for forty years, which would mean she's practiced some 2,000 times; I've made it twice in two months. My daughter has to give me a few more goes to get it right before she can criticise. And bland? Huh.

My kefta isn't bad, but I agree that it's nowhere near Fatima's. I'll keep practicing. In the meantime, I can report that I've come up with the perfect salad to go with it, and now is the time to make it, what with those very end of season capsicums, cucumbers and tomatoes. The vegetables are chopped small and dressed with lemon juice and sumac. Juicy, sour, fragrant: it goes down a treat. Although my seven year old would prefer it had no green capsicum.

Lebanese Style Chopped Salad with Sumac (and how to turn it into Fattoush)

- 2 green capsicums (bell peppers)
- 4 Lebanese cucumbers
- 2 tomatoes
- 2 spring onions
- generous bunch of mint
- a bunch of Italian flat-leaf parsley (a good 10 stalks)
- 2 tbs olive oil
- the juice of a lemon
- 3 tsp sumac
- sea salt

Sprinkle a good pinch of sea salt in the base of a salad bowl, then squeeze in the lemon. The juice will dissolve the salt. Add the olive oil.

If the cucumbers are Lebanese, chop them. If they're home grown and the seeds have grown a bit large, deseed them. And if you're substituting English cucumbers, peel and deseed them before chopping. Phew.

Chop the other vegetables into small even dice, about a centimetre square. Throw them into the bowl. Chop the herbs coarsely; make sure you still have nice bits of mint and parsley identifiable. Throw them into the bowl, too.

Sprinkle in the sumac, then toss gently but well. Serve immediately, while everything is still crunchy.

You can turn this into fattoush merely by adding some stale pita bread, cut into small wedges, at the last minute. If you like your bread crisp, brush it with olive oil, sprinkle it with sumac, and toast it in a moderate oven for one to two minutes. Break it up, sprinkle it over the salad, and eat immediately.

(Garden: parsley, mint. A friend of a friend's garden – thanks Jen and Raheem! – tomatoes, cucumbers. A neighbour's tree: lemons. Local veg box: green capsicum (bell peppers). Grampians: olive oil. Northern Victoria: salt. Imported, but it's small and flavourful: sumac.)

Monday, April 22, 2013

Dandelion Greens with Bacon


When I was fourteen, we moved to the States. My mother was offered a job in Washington, DC, and so we decamped from suburban Melbourne to Arlington, Virginia. We very quickly learned that we lived in the South; and as such we were duly introduced to barbecue, sweet potato, and chitlins (aka chitterlings). (As a sidenote, chitlins are pig intestines. What more can I say? Well, they stink. They made even my extremely dignified and polite mother gag at the table. Every recipe includes stringent cleaning instructions and warnings about bacteria. And even afficionados describe their flavour as ‘interesting’. Surprisingly, the Brunswick IGA has started stocking fried chitlins – a high protein on-the-run snack food, apparently – so if you live in the northern suburbs of Melbourne and you need some protein, now you know where to go.)

What else did we learn? We discovered that fruit salad was not a dessert. When we brought it to potlucks, we were gently chided for failing to bring something sweet, as requested, and our ‘salad’ was placed on the salad table, to be eaten with the meat. As mind-boggling as that seemed to us – who eats fruit salad with their main course? –, next to the other ‘vegetable’ offerings – a congealed salad, perhaps, of sweet Jell-O, in which grated carrot, dried coconut and mini-marshmallows were suspended, or sweet potatoes baked with marshmallows and brown sugar – our modest offering of chopped bananas and grapes looked positively savoury.

Yet there was good food, too, even if it was hard to come by. I remember spicy Cajun catfish; pulled pork and beans; apples ciders hard and soft; deep fried sweet Georgia onions; and the mountains of greens in traditional African American cooking. But these foods were never cooked in our milieu; we had to seek them out. Now I wonder why. Was the food disdained – in favour of Jell-O salads, I might add – because it had been the food of poor blacks, and lingering racism made such food unpalatable? Or was it simply that processed food had won out in a frantically busy society? After all, down home cooking does require someone to actually be home and puttering around the kitchen.

Leaving the mysteries of American food unresolved, let me tell you about this dish. One of my favourite southern foods is bitter greens (edible weeds) cooked down with a little pork: full of flavour, vitamins, and minerals. And at this time of year, when rains are heavy after a long hot summer and the dandelions are shooting up everywhere, bitter greens are in plentiful supply. Now, I have a lovely book of African-American cooking, chock full of family stories and photographs, which includes a recipe for a wilted dandelion leaf salad. But in this chilly weather I want to eat something a bit warmer, so I have turned it into a dish of lightly cooked greens, and serve it alongside hunks of sweet potato cornbread. ‘This,’ I announce to my sceptical children, ‘is part of my personal heritage!’. I am sorry to say they eat only a few greens and then go fishing for the bacon; but more mature people find it delicious. Eaten with cornpone, it forms a balanced meal with complex flavours – sweet, salt, sharp, mellow – which deeply satisfy.

Dandelion Greens with Bacon

- 200g fresh dandelion greens, picked either from your garden or from a local park; if the latter, wash especially well. The inside leaves are more tender in both flavour and texture, but you can also eat unblemished fresh (lighter green) outside leaves if you like a bit of a kick to your greens.
- 5 rashers of happy free range compassionately killed nitrate free bacon, well, good bacon
- 1 tbs olive oil
- 1 red onion
- 1 tbs brown sugar
- 1 tbs apple cider vinegar

Wash the dandelion leaves very well, dislodging any dirt or small insects. Chop roughly but do not spin dry, as you need a little moisture clinging to the leaves when they cook.

Warm the olive oil in a wide frying pan, then lay the bacon rashers in the pan. Cook them over medium heat, pushing and turning them from time to time, until they have passed from flaccid to crispy. Remove the bacon to a board (and drain on a scrumpled paper bag if you’re squeamish about eating too much pig fat).

Peel the onion, halve from stem to stern, and slice into thin half-moons. Throw the onion into the pan and cook over a brisk heat until shiny and just starting to soften; you want your onions juicy here.

While the onion is cooking, break, tear or chop the bacon into little pieces about half a centimetre square. Think bacon bits, but big, rough and homemade, and with no artificial colours or flavours.

When the onion has softened, throw the dandelion greens into the pan. Clap on the lid, and cook for a few minutes or until the greens are wilted. Remove the greens with a slotted spoon and combine them with the bacon. Turn up the heat, and add the brown sugar and apple cider vinegar to the pan. Bubble away for a minute or two, scraping madly at all the delicious little brown bits stuck to the bottom, then pour this thick syrup over the greens. Mix gently, and serve.

Adapted from a recipe in the currently out-of-print The Welcome Table: African-American Heritage Cooking by Jessica B Harris. A recipe for a delicious, pudding-y gluten free sweet potato corn bread (cornpone) can be found in Stephanie Alexander’s The Cook's Companion; click here for the recipe.

(Backyard: dandelion greens. Gippsland: some reasonably happy pig. Grampians: olive oil. Local veggie box: red onion. NSW: apple cider vinegar. Queensland: brown sugar.)

The Cook's Companion [2004 Ed.]

Tuesday, April 16, 2013

Fig and Almond Smoothie

There is a delightful chill in the air. Our longest, hottest summer is drawing to an end and autumn is, I hope, finally here – if a little late. We moved to this house just a few months ago and, until this weekend, did almost nothing to the garden; we’ve been busy, and it’s been too damn hot. But at last we had no birthday parties or young children’s engagements and it was cool enough to potter. We grubbed out the dead shrubs that greeted us when we moved in; we dug out couch grass from the overgrown beds; we forked compost through the veggie patch and under the roses; and we picked zucchini and olives and the last of the figs.

Each of my three daughters had asked for their own garden bed, and so we also marked those areas out. I had put it off, ostensibly because of the heat, but really out of fear. You see, when I was a child I had a small garden bed. I planted gladioli (shudder) and, to my parents’ horror, a lemon scented gum tree. They had said I could plant whatever I wanted – but they certainly didn’t expect me to choose a tree which would grow 30 metres tall! And grow it did; after a few years of being munched down by caterpillars, it suddenly took off. On wet days, our yard was filled with the sweet fresh scent; that particular fragrance is still one of my favourite things.

A couple of years ago, I went back to visit that house. The new owners very graciously invited me in, gave me a cup of tea, and chatted all things house. The gum was gone, and I mentioned it. They told me they had removed it only recently, as it was starting to die. However, it had lasted a good thirty years and was truly enormous by the time the end came, and I felt very proud.

But with that in mind, I was reluctant to give my kids autonomy over any part of my garden. (Yes, it’s mine.) I didn’t want it overshadowed by another gum (we already have two) or, worse, an oak. So I asked my kids what they had in mind. My seven-year-old yelled ‘herbs!’ ‘What?’ I asked, a little taken aback. ‘You know,’ she said, sighing like I’m an idiot, ‘more parsley – we don’t have nearly enough – lots of different types of thyme, sage, marjoram, and whatever else I like…’ I reflected that whenever I look out of the window she’s munching on something green; more parsley would certainly be on her wish list. Relieved, I nodded and turned to the four-year-old. ‘What about you?’ I asked, ‘What would you want in your garden?’ ‘Poppies!’ she said, ‘and maybe some other flowers.’ And the nine-year-old? ‘Veggies, nothing else. Particularly carrots.’

Clearly my kids are weird; what other children want to plant a thyme garden and carrots? But I’m not complaining: no gladioli, no eucalyptus trees, no oaks – we can do that! And so we did: we (they) planted carrots, fennel, poppies, johnny-jump-ups, thyme (three types), marjoram, sage, dill, and salad greens. And some comfrey and wormwood for the chooks.

After all that industry, we needed a treat. We had a bowl heaped with the last of the figs. Some were green, and needed to be poached; but the ripe ones I turned into smoothies.

My kids are not overly fond of figs; they find the texture alarming. It’s too sensual for them. But like Lola, they can’t resist a pink drink! So I whizzed figs with bananas and almond meal, and a drizzle of honey to make it even sweeter and hey presto! pink drink. You can make it with any type of milk, or even yoghurt. If you use yoghurt, either reduce the ice, or be prepared to eat it with a spoon: it’s very thick as it is – almost like a thick shake, only without the sugar or pig fat. Figs not pigs, that’s what I say. Mmm-mmm.

Fig and Almond Smoothie (GF, DF, SF, V*)

- 4 fat black figs
- 1 squishy banana, preferably frozen in chunks
- 3 tbs ground almonds
- ½ c rice milk, or yoghurt or moo juice if you prefer
- 1 tbs honey
- 1 c ice cubes, ie 6-8 cubes

Clean the figs and trim the stalks. Break up the banana. Throw the lot into your super-duper blender and whizz until you have a lovely smoothie. Share.

*Yeah, yeah, yeah: it’s gluten free, dairy free, sugar free, and vegetarian. You could omit the honey and make it vegan, if you want; throw in a pitted date for extra vegan sweetness.

(Backyard: figs. St Kilda: honey. Victoria: almonds. From afar: bananas, rice milk.)

I Will Not Ever Never Eat a Tomato (Charlie and Lola)

Saturday, April 6, 2013

Slow Cooked Tomato Sauce

When I think of preserving tomatoes, I always come back to the idea of sauce. I imagine an extended Italian family gathered together to cook down tomatoes, tell stories, sing songs and crack bad jokes, the older women wearing frumpy aprons, the young men a little flirtatious, a little cheeky, and everything a bit like the saccharine sugo scene in Looking For Alibrandi . But that’s not my reality, nor, I suspect, that of many Italian sauce-makers). I’m not Italian, I don’t have a big vat bubbling away with tomatoes or family and friends who seem interested in making an event of sauce making, and I’m not even sure I want it. I’m happy with just me and the kids fooling around in our kitchen, making small batches of sauce when we feel like it.

So I don’t make big batches. Instead, I preserve whole tomatoes; then, if I feel like a slow cooked tomato sauce later in the year, I use the bottled tomatoes to make a batch. But I do buy 15kg boxes of tomatoes for preserving. A 15kg box of tomatoes yields 24 Fowlers Vacola #20 jars of plum tomatoes, plus 2 to 2 ½ kilos of tomatoes left over. It’s not enough to bother bottling and running the processor again, but it’s a good amount to make sauce in a frying pan. Two kilos of fresh tomatoes cooks down to about a litre of sauce – enough for two meals in our family: one for dinner, and one in the freezer for some time next week.

Note: You will need to use a food mill or do some serious work with a sieve for this recipe.

Slow Cooked Tomato Sauce

- 2 to 2 ½ kg ripe Roma tomatoes (the sauce is all about the tomatoes, so ensure they are ripe to begin with – and Roma, or sauce, tomatoes make the best sauce, surprise surprise, because they have lots of flesh and very little juice or seeds)
- 1 red onion
- olive oil
- rosemary (or if you prefer, thyme or basil)
- salt

Warm a couple of tablespoons of olive oil in a wide deep frying pan over low heat. Peel the onion and halve it lengthwise. Slice it into very thin half moons. Drop the onion in the pan and sprinkle it with a good pinch of salt. Cook it for a few minutes, or until it softens, but do not let it colour.

Take a sprig of rosemary a couple of inches long. Strip the needles from the stem and chop them very finely. Add them to the pan.

Quarter the tomatoes – no need to peel or core – and throw them in the pan. Cook over a gentle heat, stirring from time to time to ensure nothing sticks to the bottom of the pan. The tomatoes will collapse and the skins will loosen. Keep cooking for two to two and a half hours, or until most of the moisture has disappeared.

Remove from the heat. Scrape the tomato mixture into a food mill and press through. (Or rub it through a sieve, much harder work!) You will be left with a rich red sauce; discard the skins. Test the sauce. If it is thick enough, well and good; otherwise, return it to the pan and cook down until it is the consistency you long for. Half a batch is enough for a packet of pasta for our family – but if you like your pasta to swim in the sauce, use the entire batch! Serve with grated parmesan.

Notes: Of course, you can also make this sauce with two or three Fowlers Vacola #20 bottles of whole tomatoes. Because the tomatoes have been processed, you can reduce the cooking time: first check the thickness at 1 hour, and then cook until it's as you like it.

This sauce is also good as a pizza topper, and it freezes well. It is not, however, suitable for preserving via the Fowlers Vacola system as the addition of onions can lower the acidity to a point where little nasty microbes are able to breed.

If you want to see how real Italian Australians make sauce, click here. 34 boxes of tomatoes? Eight hours of boiling? Very impressive – but not my cup of tea! And I see that a neighbour and fellow blogger just posted on her never-to-be repeated childhood experience of sauce; now she opts for small batches, too.

(Backyard: rosemary. Grampians: olive oil. Local veg box: onion. Northern Victoria: tomatoes, salt.)

Thursday, April 4, 2013

Bottled Tomatoes

Yet another post about bottling! Preserving is clearly on my mind, and this is the time, in early autumn, when tomatoes are cheap and plentiful. But why would a busy girl bottle?

All eating, in fact all decisions, are a question of values. We all have lots of values jostling for primacy; our decisions bear out which values are foremost. And with food, the value equation is sometimes very difficult to calculate. Organic? Not organic? Local? Imported? Cheap? Expensive? Fair trade? Sustainable? Delicious? – well, duh!

For me, deciding which type of canned tomato to use requires lots of value juggling. My preference would be for cheap, local, organic, sustainable canned tomatoes delivered to my door. In an ideal world, they’d be bottled in glass, which I would then return to the distributor for re-use. But this does not exist, at least not in my neighbourhood.

Mostly, then, we have bought Italian organic canned tomatoes. I cringe at the air miles, but I also cringe at Australian canned tomatoes: the open irrigation channels that water tomato crops in the desert; the sprays used; and the flavour. So often Australian canned tomatoes are watery and tasteless, and an unappetising pink. People, ripe Roma tomatoes are deep red! So I’ve used Italian organic tomatoes. Then an Italian friend came over, glanced at a can, and muttered something about the Albanians. ‘What?’ I asked. She told me all about the illegal immigrants who work in the Italian tomato fields in slave-like conditions and said she’d never buy tomatoes from Italy. She is a wise and gentle woman and I trust her. But sheesh!

I looked at other options. In years past I’ve bottled organic Victorian tomatoes, but now I’m feeding a family of five plus lots of guests the cost is prohibitive. $15 a kilo for organic tomatoes which then need to be processed vs $3 a kilo for Italian imported canned tomatoes that require no further work?! I’m not doing that anymore.

I decided ‘organic’ had to go. I bought Victorian grown conventional tomatoes from my Italian greengrocer. At $12 per ruby-red 15 kilo box, they satisfy my values of local, cheap and delicious. Then my daughters and I canned them, which satisfied a whole bunch of other values: educational, as I teach my kids how to do useful stuff; familial, as we work together to produce something nourishing for the family; and aesthetic, as a dark cupboard glinting with row upon row of bottled tomatoes is a sight to behold. My neighbours walked in and admired, with the result that I’ll make a batch for them – so now a communal value is also being satisfied.

The last value is perhaps the simplest: a busy girl might preserve because she enjoys it. There is nothing quite like the deep satisfaction that comes from doing good work. We live in such an age of leisure that it’s taken me a long time to recognise that working at something I love, especially when it’s easy and productive and repetitious, is much more fun than being idle. When I’ve finished a batch of preserves or jam, I float on air. I gloat, wandering in and out of the kitchen to look and look again. I leave things on my tiny bench for an extra day just so anyone who walks in the house notices; then I am casually off-hand about preserving – but inside, a little child is jigging about singing ‘Look what I can do!’. It’s satisfying in a way almost nothing else is.


So those are all the reasons why I bottle; maybe one or two of those reasons might inspire you to bottle, too! So let’s get down to the nuts and bolts. In the past, I used Fowlers Vacola’s suggested method, which is to can whole tomatoes in water. They were okay but not great. This year I’ve followed the suggestion of Food in Jars: to place whole peeled tomatoes in the jars with some serious squishing action, which results in tomatoes canned in their own juice. Beautiful to behold, they are also absolutely delicious. So all kudos to Food in Jars for the method. I provide instructions below for Australians using Fowlers Vacola jars; if you use Mason jars or want to see descriptive photos, click here.

For the most part, I use a Fowlers Vacola #20 jar for tomatoes. I can’t tell you how many individual tomatoes per jar because the tomatoes in the boxes I get vary enormously in size and weight, but it’s about 600g of tomatoes. Eight #20 jars fit in the Simple Natural Preserving Kit; so five kilos of tomatoes makes eight jars plus a few over for lunch or the next round. I buy 15 kilo boxes, then fill and process 24 jars over two days (ie three runs through the kit); the remaining two or so kilos of tomatoes I turn into a slow cooked tomato sauce.

Bottled Tomatoes

- ripe Roma tomatoes, red inside and out. Roma, because they have an excellent flesh to juice ratio. Note that preserving them will not make them ripe. You do need to source properly ripened tomatoes.
- commercially made lemon juice (you need lemon juice to acidify the tomatoes, thus rendering them safe; use a commercial product to ensure the acidity is consistent, unlike the acidity of backyard lemons)

Soak the rubber rings in hot water for 15 minutes. Wash the jars and lids in hot soapy water. Fit the rings onto the wet jars, being careful that there are no bends or kinks in the rings.

Place 2 tsp lemon juice into each #20 jar; 1 tbs lemon juice into each #31 jar; check the Fowlers Vacola instruction book for all other jar sizes.

Bring a large pot of water to the boil. Ready a bowl of cold water beside the stove. Using the tip of a small paring knife, core the tomatoes in one deft twist of the knife. Slice a cross in the base of each tomato. Drop five or six tomatoes at a time into the boiling water and leave for one to two minutes. Remove with a slotted spoon and drop into the cold water.

Get a four-year-old to fish out the wet tomatoes and slide the skin off in one easy motion. She can also pack the jars. Drop tomatoes into the jars, jiggling a little to get a firm pack. You may need to use either your four-year-old’s little hand or a wooden spoon to pack the tomatoes firmly. Squish them a bit as you pack so that the juices ooze out. Keep packing and squishing until you have a jar full of tomatoes and juice. Ease out any air bubbles with a packing stick.

Leave a 12mm headspace. Wipe the rim free of any pulp or juice, place the lid on the jar and fit the clip. When eight jars are ready, load up your preserving kit and process for an hour.

My preserving kit comes to the boil quite early. I turn it off at the forty minute mark for ten minutes, then turn it on again until the time is up. The water stays stinking hot during that time, and that way you get an hour at the correct temperature without it boiling away.

As soon as the hour is up, remove the jars and place them on a wooden board or a pile of old newspapers. Leave them to cool for eighteen hours. Remove the clips. Label each jar clearly with the date and batch number, and hide away in the hall cupboard or somewhere else cool and dark. They will keep for several years, but are best eaten within twelve months.

These tomatoes are terrific in stews and casseroles, or cooked down into pasta sauce. Yum!

(Victoria: tomatoes. No idea (‘local and imported ingredients’, sigh): lemon juice.)

Thursday, March 21, 2013

Bottled Figs with Red Wine and Spices, and a whole lot more besides!

The one problem with water bath processing is that it involves a whole lot of water and power. Often, a person who has a small home garden may find it hard to justify using a water bath; when you seem to have enough produce for only one bottle, there's no point getting out the preserving machine.

Then again, getting out the machine can motivate you to look around and see what else is available, even in a little garden.

Take this week. A friend dropped by with two quinces. They were windfalls she had found on the footpath, and she thought I might know how to use them. True. But by the time I cut out the wormholes, there wasn't really enough to bake or make marmalade or paste. Perhaps there was enough for one or two bottles of poached quinces, not enough to justify a water bath.

But then I noticed a dozen fat figs on the tree going begging, also not enough for jam or paste, but too many to eat in one go.

And our pear tree had a few pears on it, very ripe.

And our little espaliered apple trees were starting to drop their several fruits.

And our veggie box had delivered a big bag of black grapes last week, but my fussy kids hadn't eaten them.

And there were some roma tomatoes sitting in the fruit basket, and they're good for canning.

And my four-year-old is going through a chopping stage, and wants to spend all day cooking.

So this is what we did.

I made a honey syrup for the quinces and lightly poached them. Then we packed them across two jars; they came two thirds of the way up the sides. We topped them up with apples from the garden, aiming for a casual layered look.

My daughter halved all the figs while I warmed a little leftover red wine with some sugar and spices. We barely poached the figs in the fragrant syrup, then packed them in a jar.

According to the Fowlers Vacola book, preserved grapes are 'excellent'. I have my doubts, but I'll try anything once, so my daughter carefully halved all the black grapes and we bottled them in water with a tablespoon of blackberry honey.

We peeled and cored the pears, and packed them with a tablespoon of sugar and a cinnamon stick.

Finally, my daughter quartered and packed the tomatoes.

A bit over an hour and six jars later, we had enough to justify running the processor and my daughter was beaming. And so was I. Now we have five desserts ready for winter, plus a bottle of tomatoes, to add to our stash in the hall cupboard.

As everything was very simple I won't record the recipes except, perhaps, for the figs.

Bottled Figs in Red Wine and Spices

For each Fowlers #20 jar:

- 12-15 fat black figs
- 3 tbs red wine - 3 tbs white sugar
- 1 stick cinnamon
- 6 cloves

Gently warm the wine, sugar and spices with 150ml water in a medium sized saucepan, shaking until the sugar has dissolved.

Cut off the fig stalks, and halve each fig. Place the figs in the saucepan, and cook for 4 or 5 minutes, gently shaking from time to time. Allow to cool.

Pour much of the liquid into a #20 Fowlers jar, holding back the figs with a slotted spoon. Now gently pack the figs into the liquid, using a packing stick to release any air bubbles. Seal and process according to instructions.

Note: This doesn't look like a lot of liquid. However, as the figs soften they will release ample liquid, which should be sufficient to cover them in the bottle. If you do find yourself a bit short, however, just top up with a little cold water.

You might also like to add a long strip of orange peel, or perhaps a few drops of orange flower water, to each jar.

PS – I'm sure a real food blogger would manage a nice photo. The figs are ugly and the glare from the glass is terrible. But trust me, they're good!

(Backyard: black figs. Healesville: wine. Not so local: sugar, spice.)

Wednesday, March 13, 2013

Soft Fig Jam


Mid-March: fig season. We’ve been racing the bats and the parrots to eat the figs from our tree, going out most days to strip what we can reach before the furred and feathered varmints fly in. The best figs are those which are left to ripen fully on the tree, or until they are totally testicular. Of course, leaving them adds a slight element of risk: one pesky possum, or four fruit bats, can eat a lot in a night. And if the varmints don’t get them, and they are left too long, then they become fizzy and unpleasant. But perfectly ripe figs are so succulent that I am prepared to play the waiting game even at the cost of a few figs; it’s one of the few forms of gambling I am willing to participate in. Who needs a casino when you can experience the thrills of the high life, right here in the suburbs?!

There is a limit, however, to all this delightful decadence; one can’t eat too many figs at a sitting, lest one be forced to sit all day. So then I turn to jam. I use the classic Fowlers Vacola recipe with one exception: I don’t add extra pectin. It leaves a metallic tang and somehow flattens the flavours of the jam; needless to say, but I’ll say it anyway: I just don’t like it! As long as you throw a few less ripe figs into the mix, the jam will set sufficiently without the use of additives; you’ll get a sensuously soft jam that drops in dollops from the spoon, just right for blobbing onto toast or scones, crackers with a soft goats cheese, porridge, or a bowl of creamy natural yogurt.

If you don’t have your own fig tree, go for a laneway walk through an old migrant suburb one evening. You should find sufficient figs hanging over the fence for at least a half batch of this jam – enough for three standard jam jars or so.

Soft Fig Jam

- 2 kg ripe black figs, plus a few not very ripe figs
- ¾ cup orange juice (This is the juice of approximately two oranges.)
- ¼ cup lemon juice (How many lemons? Backyard lemons vary enormously: anywhere from half a lemon to two lemons!)
- 1 kg white sugar
- 2 tbs sherry (optional)

Place a saucer in the freezer.

Wash the figs and behead them, making sure to cut below the point that the stem is oozing white sap. Throw the figs into a food processor or blender, and pulse-chop until you have a coarse purée. (Alternatively, you can chop them finely by hand.)

Place them in a deep saucepan, and add the orange juice and lemon juice. Cook over medium-low heat for five to ten minutes, or until the purée is quite soft. (The cooking will also remove any air bubbles introduced when you whizzed the figs in the food processor, so don’t be surprised if the volume goes down.)

Add the sugar a quarter-cup at a time, stirring well after each addition so that the sugar is dissolved and the jam doesn’t lose much heat. Add the sherry. Cook for 25 to 35 minutes at a gentle bubble, stirring regularly to ensure none sticks to the bottom, until it has reached the setting stage. (If you prefer a well-set jam, cook it for a bit longer.)

To test for set, fetch your saucer out of the freezer and plop a dob of jam on it. Leave it for a minute. Now push the blob with your finger. If it separates into two distinct halves and has a slight crinkle on the surface where it has been pushed, it is set. If not, cook for another 5 minutes and test again; repeat until set. (The time it takes will depend on your fruit; the riper the fruit, the longer it takes.)

Turn off the heat. Let the jam sit for five minutes before pouring into hot clean jars.

Clean Jars: You’ll need six or seven jam jars. Wash them through the hot cycle in the top level of your dishwasher; or wash them in hot soapy water then run them through a baby bottle steriliser (good for small batches); or wash in hot soapy water then place in a low oven for twenty minutes – all before filling with jam. The method you use will dictate when you wash them eg you may need to turn on the dishwasher just before you start the jam in order to have the jars clean and hot when it comes to bottling time. Be intelligent: work out how you’re going to do it, and work out the times. I can’t do it for you!

Personally, I use the baby bottle steriliser then go two routes. If a bottle has a metal lid, I screw on the lid, then flip the jar and leave it to stand upside down for twenty four hours. This is the French preserving method. If it doesn’t have a metal lid or if I am using a drinking glass, I use a Fowlers Vacola Kleerview Cover, available at my local supermarket, or direct from Fowler’s, or from the lovely Robert at Bee Sustainable in East Brunswick. (And to throw in an ad, which he doesn’t know about and hasn’t paid for- this month he has blackberry honey; that is, honey made from the pollen of blackberry flowers. It’s incredible; the berry flavour really comes through. Go get some before he runs out!)

(This recipe is barely adapted from Fowlers Vacola's Secrets of Successful Preserving, which you get when you buy one of their preserving machines. I think it’s also available directly from them. Their website is under construction at the moment, but you can visit them at 23 Racecourse Road, North Melbourne, and stock up on all matter of preserving equipment while you’re at it!)

(Local backyards: black figs, lemons. Victoria: oranges, sherry. Not so local: sugar.)

Tuesday, February 26, 2013

Fig and Almond Clafouti


Evening in Coburg. The back door is open. Someone is singing their prayers; their voice floats in on the night. A train hoots low as it approaches the crossing. The bells ring.

There is a sudden thump, and a shake, and a rustle. The fruit bats are visiting our fig tree. As they lumber through the branches, feasting as they go, they meet each other and voice their claims in outraged squeaks.

Each morning, we wake to a fresh crop of butchered figs littering the ground. Late afternoon, we put up the ladder and fetch our crop for the day, a dozen or so fruit newly ripened by the sun. Each evening, the bats come back and demolish what we could not reach, and so the cycle of life continues.

We have been eating fresh figs, baked figs, figs galore. And for dessert, fig and almond clafouti. The almond meal make this a very moist, very rich dish. If you want a drier, firmer dish, substitute coconut flour for half the almond meal; or, if you have no problem with gluten, white flour. However you make it, it is a truly figgy pudding – and absolutely delish!

Fig and Almond Clafouti

- 15 to 20 ripe black figs
- butter, to grease the dish
- 1 cup milk
- 3 large eggs
- 1 tsp good vanilla essence
- 1/4 cup brown or coconut sugar
- 1/2 cup almond meal
- a pinch of salt
- a handful of flaked almonds

Grease a 10” ceramic tart dish or skillet. Behead the figs, then halve or quarter them and lay them in the dish.

Mix the milk, eggs, vanilla essence, sugar, almond meal and salt together. You can use a blender or a whisk – either way, aim for frothy. Pour this mixture over the figs.

Sprinkle a generous handful of flaked almonds over the top. Slide the dish into the oven, and bake for 40 to 45 minutes. Remove from the oven, and leave to cool and set for at least ten minutes before slicing. Serve warm or cold.

Very good for breakfast!

(Backyard: figs, eggs. Victoria: almond meal, almonds, milk, butter, salt. Imported, but fair trade and organic: coconut sugar, vanilla essence.)

Tuesday, February 19, 2013

Gazpacho


Alison, Alison where have you been?

I’ve been... unpacking a house, looking after three girls over a long summer break, processing apricots, plums and tomatoes, and not writing anything down. Nothing very exciting, really, just life as we know it. We moved house two months ago, and have no veggie garden to speak of yet – just a few plants of fat hen (hooray) and a lawn full of dandelions (which, when combined with fennel tops and grapefruit, make a fantastic green smoothie for breakfast). But we haven’t managed to put in any veggies. So I’ve also been looking at my garden and sighing, then fanning myself in this goddamn heat and wondering what to cook.

Now, as the queen of frugality, I buy dollar packs of tomatoes at the local greengrocer. You know the ones out front, where the bottom tomatoes are a bit squishy and you have to cut out one or two brown bits? Well, I’ll let you in on a secret: those ugly buglies are full of flavour. And the other day I had a few green peppers from the weekly veggie box, and some cucumbers from a friend. As the sweat ran down my brow, from the depths of memory surfaced the tang of gazpacho. Cool, cool soup, beading droplets of condensation on a bowl. Just the thing for yet another hot day.

Gazpacho was traditionally a bread soup. I can’t eat bread, so with great arrogance I just left it out. Nobody missed it. What resulted, then, was effectively a whizzed salad dressed with white wine vinegar – what’s not to like?! My oldest daughter et it, sighed, and announced this was now her favourite soup. It has displaced lentil soup in all its forms. And so on the strength of her recommendation, I give it now to you.

Gazpacho

- 1 kg very ripe tomatoes
- 2 green capsicums (aka bell peppers)
- 1 tiny (or half a normal sized) red onion
- 2 cloves garlic
- 2 tbs white wine vinegar
- slightly less than half a cup decentish olive oil
- sea salt, to taste
- 1 mighty English cucumber (although I'm sure little Lebanese would be more authentic)

Peel, seed and chop the tomatoes. You can peel the tomatoes by cutting a cross in the base of each tomato, submerging it in boiling water for a minute, removing it with a slotted spoon, and taking the peel off. This is the boring bit; get a child to help you. Squeeze out the juice and seeds. You can drink the juice if you want; but for the soup, you only need the flesh of the tomatoes.

Deseed one of the capsicums and chop it small. Peel and chop the onion. Peel and smash the garlic. Place the tomatoes, chopped capsicum, onion, garlic, vinegar, olive oil and salt in a blender. Blend the heck out of it until all is beautifully combined. Add a little water if it seems too thick.

Pour it into a large bowl or soup tureen, cover, and place in the fridge. Leave for at least three hours to chill properly, and for the flavours to get to know each other.

When you are almost ready to eat, peel and deseed the cucumber. I just slice the cucumber in half lengthwise then run a metal spoon down the inside of the cuke; all the seeds pop out. Chop it small. Deseed the second capsicum and chop it small too.

Serve the soup. Adorn each bowlful with a generous sprinkling of the chopped cucumber and capsicum. Pass the pepper.

(Home grown, if not by me (thanks, Nathan!): cucumber. Local: tomatoes, capsicum, onion, garlic, olive oil. Northern Victoria: salt. Greece: white wine vinegar.)

Saturday, January 5, 2013

Apricot and Almond Cake


There are times when one needs a good solid cake. Claudia Roden's orange and almond cake, while spectacular, has been done to death in our milieu, and yet I am still an absolute sucker for cake made with almond meal. This month, casting about for something to take to dinner with friends, my eye lit upon the latest bucket of apricots sitting in the kitchen. I stewed them up, took out a great dollop and, using the formula from pear and almond cake, made an apricot and almond cake.

Mmmm. The cake came out tinted gold, and was deeply redolent with apricots. We ate it for dinner with double cream and it was spectacular; it was also very good over the next day or two, demolished in great chunks until there was nothing left. The almond meal renders it very moist, and so the cake keeps well.

The recipe calls for slightly fewer apricots than a Fowler's No. #20 jar, so if you have already preserved apricots, particularly as purée, the cake will take only minutes to prepare. The remaining apricots in the jar are a perfect addition to plain yogurt – or indeed, you could warm them slightly and serve them with the cake.

You can see from the photograph that I cooked my cake slightly too long. My dinner companions, old friends all, reckoned they loved the slightly chewy bits; they're the bits I call overcooked. However, I'm never entirely convinced by the enthusiasm of good and faithful friends, so I recommend you check your cake from 35 minutes; don't leave it too long!

Apricot and Almond Cake

- 8 eggs
- 325g ground almonds
- 275g lightly stewed apricots
- 275g golden caster sugar
- a squeeze of lemon
- 40g slivered almonds

If you have not already stewed your apricots, do so now and leave them to cool. (I recommend making extra and using it as a sauce on the cake, or dolloped onto tomorrow's muesli, or swirled into a late night yogurt.)

Grease and line a 25cm spring form pan. Preheat the oven to 180°C.

Place everything bar the slivered almonds into a food processor, and whizz until you have a batter. Pour the resulting glop into the pan. Sprinkle with slivered almonds. Slip into the oven.

Bake for 40 minutes or until golden and a cake tester comes out clean. Leave to cool in the tin on a baking rack. Eat plain for afternoon tea; with cream for dinner; or with a black coffee for elevenses.

Adapted from a recipe by Nigella Lawson in her terrific book, Feast: Food that celebrates life, itself a variation on Claudia Roden's orange and almond cake in The New Book of Middle Eastern Food.

(Backyard: apricots, eggs, lemon. Somewhere in Australia: almonds, sugar.)

Feast: Food that celebrates life The New Book of Middle Eastern Food

Tuesday, January 1, 2013

Apricot Jam, Simple and Perfect


It's rather eccentric, I realise, to use a food blog to talk about vomit, but here in the real world that's how life is. The quote of the week goes to my nine year old. Her father called, 'Don't put apricots in the vomit bucket!' And she looked at him and yelled, 'What? This bucket's been vomited in, that bucket's been vomited in, what am I supposed to use?'. It's true, folks, all four of our plastic buckets have been vomited in these holidays. God, I love small children. But I assure you that the buckets had been washed out in hot soapy water and left in the sun for a few days before she used them to collect apricots; and now I've been making jam.

What says summer more clearly than jam? Backyard trees are covered in fruit, far too much to eat fresh... so I'm busy stewing, canning, and jamming it up. Most instructions for jam call for perfect, unblemished fruit. Perhaps there are people who buy boxes of perfect fruit for jam, but in this house jam is made from the imperfect, quite blemished fruit off the trees in the backyard. We have two apricot trees. Some of the fruit is surprisingly large and unblemished, and that is eaten straight off the tree – why waste effort on something that is already perfect? But most of the fruit is small, some of it is parrot-pecked, and a little is even wormy. And it's the small, pecked and wormy fruit that is thrown into buckets ready for preserving.

 
Jam is easy. An hour in the kitchen leaves you with something several hundred times better than anything you can buy in the shops; if the fruit is already stewed, it will take only twenty minutes. I admit that large perfect fruit will give you much more jam for your time than the small blemished fruit, but it all works.

I find the easiest way to make jam with the small fruit is to prepare the fruit one evening, and make jam the next. I don't make large quantities of jam anymore, as we eat very little sugar these days; but it makes a nice sometimes food, and a lovely gift. The following instructions make about four jars of not too sweet jam, decadently fruity, which, because of the low sugar content and sealing method, should be eaten sooner rather than later.

The jars are sealed using a traditional French method. Use pop top jars (you know, those jars with bumps in the middle of the lids), wash them in very hot soapy water, allow them to dry, pour in the jam, screw the lid on tightly, then flip the jar and leave it to cool upside down on the bench for 24 hours. The lid will seal very tightly. It is a reasonably safe method, but not one approved by any modern government department.

If you are concerned about food safety or plan to store your jam for a long time, then use a 50/50 fruit/sugar ratio and sterilise the jars properly. The easiest way to sterilise small quantities of jars is to use a baby bottle steriliser; in lieu of that, you'll need boiling water and ovens... go find instructions, and good luck!

Apricot Jam

- 1.5kg apricots (approximately; you will need to weigh them once they are prepared to gauge how much sugar to use. Slightly underripe fruit will give better results - firmer jam - than slightly overripe.)
- white sugar (jam made with brown sugar tastes gross and goes off)
- 2 tbs lemon juice

Prepare the apricots. Remove the pits and quarter the flesh. If the apricots are, like mine, a bit wonky, cut out any pecks, wormholes, or bruises. Throw the good stuff into a large pot. Don't worry if there are big bits and little bits; we are making real food, not exhibits for the royal show.

Add the lemon juice. Turn on the heat low, and gently cook the apricots until they have collapsed. Stir from time to time to ensure they don't stick. You do not need to add water; apricots produce plenty of moisture as they cook.

When the apricots are lightly stewed, you can either turn off the heat, allow them to cool, and continue tomorrow; or you can continue now.

Wash the jam jars and lids in hot soapy water and place them in a cool oven (ie the lowest temperature setting) while you finish the jam.

Weigh the stewed apricots. You will need 70% of the weight in sugar (ie 1kg apricots = 700g sugar). Warm the apricots, then add the sugar in five or six batches, stirring between each batch to help it dissolve. Bring to a gentle boil, and let it plop away for 15 minutes or so, stirring occasionally to ensure it doesn't stick.

While the jam is cooking, put a ceramic plate in the freezer.

After 15 minutes, the jam should be looking quite glossy. Fetch out your chilly saucer, put a blob of jam on it, and leave it for a minute. Now run your finger through the middle of the blob. If the now-separated-blob remains in two well formed blobs, amoeba-like, the jam is ready; if the two halves run back together, give it a few more minutes.

Place the hot jars on a wooden surface or board. (Careful: they really are hot!) Ladle or pour the jam into the jars. (I use a stainless steel jug.) Using a clean cloth, wipe any drips off the rims of the jars, then screw the lids on and invert the jars. Leave to cool upside down for 24 hours. The next day, flip the jars right side up and clearly label. Store in a cool dark place – NOT above the fridge or anywhere else high in the kitchen as that's where all the heat sits.

Should keep for a year, but jam never lasts long in our house.

(Backyard: apricots. Gleaned from a laneway: lemons. Bought from afar: sugar.)


Jam Mummy's an astrophysicist, Daddy's a house husband, and makes very good jam - if a little too much!